Westward Expansion Activity: Heading West Wagon vs. Railroad Craft for Kids
Try this fun Westward Expansion activity for kids! Students compare traveling west by wagon vs railroad with a hands-on craft and writing review. This aligns with CKLA grade 2 curriculum.
Christina Henderson
4/25/20263 min read
Heading West Activity: A Fun Westward Expansion Craft Review for Kids
We just wrapped up our CKLA Westward Expansion unit, and I really wanted to do something fun that could also serve as a review before our test.
A big focus of the unit was learning about how difficult it was for families traveling west in covered wagons and also the impact the railroad had on westward expansion. This activity let us review both of those ideas in a hands-on way.
I absolutely loved this one because it included:
a small writing piece
a hands-on craft
compare-and-contrast practice
a fun way to review before the test
Honestly, it was the perfect mix of learning and creativity.
Students compared traveling west by covered wagon vs. railroad, then turned their learning into a simple 3D craft.
You can even grab my free Canva template HERE.
Bonus tip: Canva accounts are free for educators, which makes this super easy to prep.
The best part? You only need minimal supplies, and most of these were already stocked in my classroom. I’ve also linked the supplies I used through my Amazon affiliate links to make ordering easy if you need anything.
Supplies Needed
Canva printout
Craft sand (optional, but so fun!)
Small cups (only if using sand)
Glue sticks- I always use these glue sticks as they last the longest!
A lot of these are staples I always keep in my classroom because they work for so many hands-on projects throughout the year.
If you love stocking up on versatile classroom supplies, be sure to check out my blog on classroom art must-haves.
Step 1: Complete the Writing Portion First
I found it was much easier to do all of the writing first since the craft becomes three-dimensional later, and it’s hard for students to write neatly once everything is glued on.
First, the kids colored the cover of the printout, and we reviewed where pioneers started their journey and where they were heading while looking at the map.
Then we drew a line from the East Coast to Oregon.
This was such a great opportunity to revisit just how far the journey was and talk again about why traveling west was so difficult.
Next, we moved to the back cover and completed the Venn diagram comparing travel by wagon vs. train.
After that, everyone finished the sentence stems for both the wagon and the railroad, giving at least one reason why pioneers traveled that way.
Step 2: The Creative Part — Making the Wagon and Train
This was definitely the kids’ favorite part.
For the wagon, we cut simple shapes out of brown construction paper:
one rectangle for the wagon body
two circles for the wheels
The students decorated each piece and added details like wheel spokes.
Then we glued the pieces onto the wagon side.
After that, each student got two cotton balls, which they stretched out to create the covered wagon top.
I always keep cotton balls stocked in my classroom because we end up using them in several projects throughout the year.
For the railroad side, we cut shapes out of black construction paper to create the train.
Some students chose to make actual train cars, while others created train tracks using rectangles.
I loved letting them be creative with this part instead of making every train look the same.
Then I gave each student one cotton ball, and they pulled it apart into smaller pieces to create smoke coming from the train.
They glued the pieces above the train, and it turned out so cute.
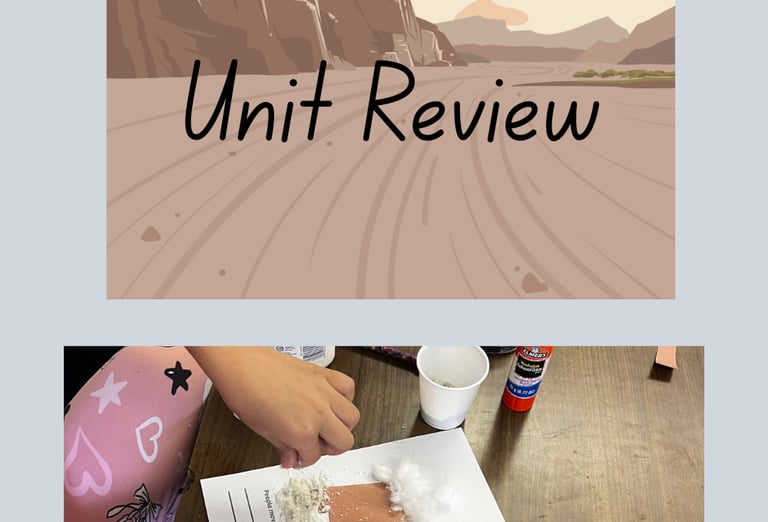
Step 3: Optional — Add Sand Details
This step was optional, but honestly, it made the activity extra memorable.
We talked about what the terrain was like while traveling west and discussed how many areas were dry, dusty, and rocky.
To show this, students added craft sand along the bottom of their papers.
I gave each student a small cup with just a little bit of sand.
They added glue to the bottom section and sprinkled the sand on top.
They absolutely loved this part.
Sometimes it’s the simplest additions that make an activity feel extra special.
Final Thoughts
That’s it — our craft was complete!
The kids had so much fun reviewing the unit, so it truly felt like a win-win activity.
I originally planned to display them in the hallway, but I ended up sending them home the next day so students could share their work with their families.
I always love finding ways to make learning more hands-on whenever possible.
If you enjoy classroom activities like this, be sure to check out my other hands-on ideas: