Easy Star-Spangled Banner Craft for Kids: Salt Painting Fireworks Art (Second Grade American History)
Looking for a fun American History craft? This easy Star-Spangled Banner salt painting activity is perfect for second grade! Step-by-step instructions, supply list, and classroom tips included.
Christina Henderson
3/1/20262 min read
🎆 Star-Spangled Banner Salt Painting Craft (Perfect for 2nd Grade!)
In second grade, we have been learning all about American History 🇺🇸 and I’ve been working extra hard to keep my students engaged throughout the unit. Let’s be honest — history can feel a little abstract for little learners unless we bring it to life! If you are looking for other history crafts, check out my post on our Easy Quill Craft— the kids loved that as well!
We recently learned about Francis Scott Key and the story behind “The Star-Spangled Banner.” After reading and discussing the history of the song, I wanted to create something meaningful to display in our hallway.
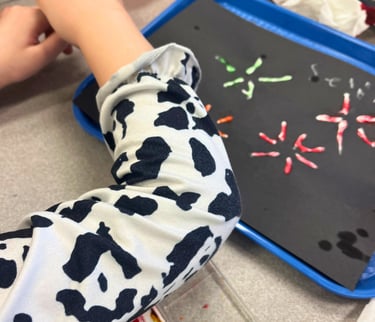
So… we made salt-painted fireworks 🎇
It was a HUGE hit!
This craft:
✔ Isn’t very messy
✔ Can be completed in one school day
✔ Keeps kids engaged
✔ Makes a beautiful hallway display
Win-win! 🙌
This post contains affiliate links at no extra cost to you.
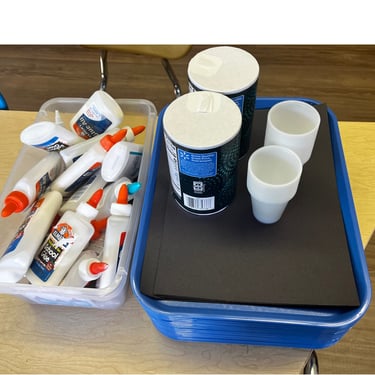
🧺 Supplies You’ll Need
School glue bottles (buy in bulk to save time!)
Table salt
Small cups for holding salt
Optional: Chalk (for sketching fireworks)
Classroom trays (these are a MUST for easy cleanup!)
✨ Teacher Tip: Trays have been one of the best classroom purchases I’ve ever made. They contain the salt and make cleanup so much easier!
If you’re building up your classroom supplies, I also share all my go-to items in My 15 Amazon Supplies Every Teacher Needs
Step-by-Step Instructions
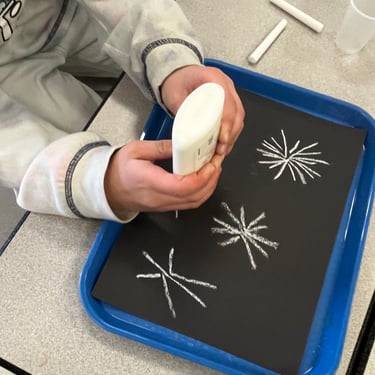
✏ Step 1: Sketch the Fireworks
Have students draw their firework designs on black paper.
I used chalk because it shows up really well on dark paper and helps students see their design clearly.
🧴 Step 2: Trace with Glue
Students trace over their chalk fireworks using glue.
👉 Make sure glue bottles are full! Half-empty bottles are much harder for little hands to squeeze.
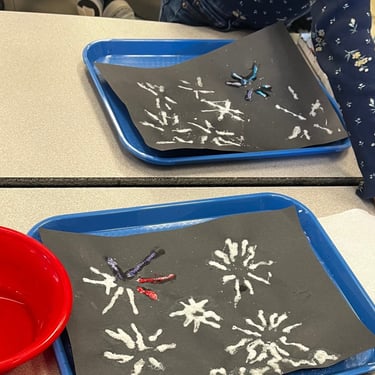
🧂 Step 3: Add the Salt
Give each student a small cup of salt.
Sprinkle the salt directly over the glue lines. Then gently shake off the excess.
Using cups instead of shared containers made this process SO much easier in my classroom!
⏳ Step 4: Let It Dry
Allow the glue and salt to dry for a couple of hours.
I shook off extra salt before returning them to students.
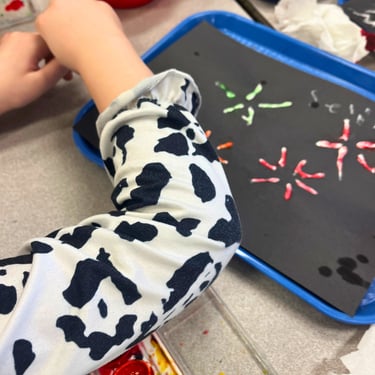
🎨 Step 5: Paint & Watch the Magic!
This is the best part! ✨
Students gently paint over the salted glue lines with watercolors. The paint spreads beautifully across the salt, creating a magical bursting firework effect.
The kids were amazed watching the colors blend and travel!
🏫 Display Idea: Hallway Heading
After letting the paintings dry overnight, I created a hallway heading that said:
“Oh Say Can You See”
The students instantly recognized the lyrics and were so proud seeing their artwork displayed. It made our American History unit feel meaningful and memorable 💙
💡 Why This Craft Works for American History
Connects art with historical learning
Reinforces knowledge about Francis Scott Key
Encourages creativity
Creates a school-wide visual celebration
Keeps students engaged through hands-on learning
If you're teaching about The Star-Spangled Banner, this activity is a must-try!