Why Spring Signs Make Your Classroom More Fun
Bringing DIY Cricut signs into your classroom is a great way to brighten up your classroom without spending a ton of time.
Christina Henderson
1/14/20262 min read
Spring just has a way of bringing fresh energy into the classroom—flowers are blooming, the sun is finally sticking around longer, and the kids are so ready for bright colors and new themes. One of my favorite ways to embrace the season is by adding simple spring-themed signs around the room. They’re cute, customizable, and totally beginner-friendly if you’re just getting started with your Cricut. Plus, your students will love spotting new decorations around the space!
Supplies You’ll Need (Cricut beginner tools, vinyl, transfer tape, cardstock)
The best part about this project is how low-stress it is. You’ll just need a few basics:
A Cricut machine (any model works!)
Adhesive vinyl (spring colors are always a plus)
Cardstock (for backing or layering)
Scissors or paper trimmer
If you’re a Cricut beginner, these are all super manageable and won’t require advanced settings or tools.
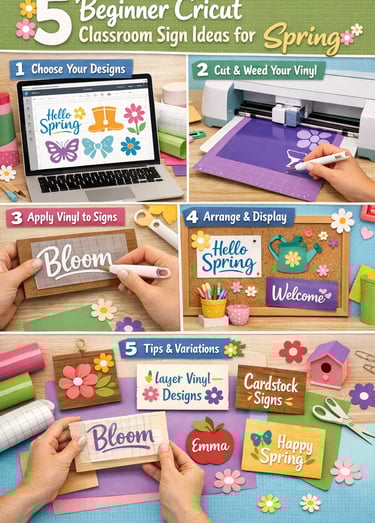
Step 1: Choose Your Spring Designs
Start by hopping into Cricut Design Space and browsing for spring icons or phrases. Think flowers, rainboots, sunshine, butterflies, or simple words like “Bloom,” “Hello Spring,” or “Grow Kindness.” Keep sizing in mind based on the signs you’re decorating—small signs look best with simple, bold designs.
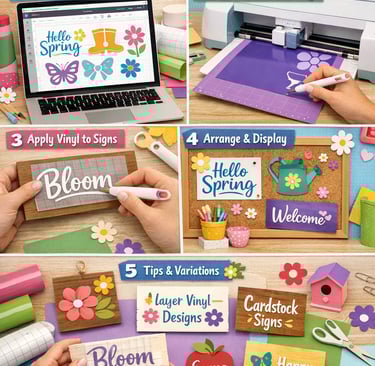
Step 2: Cut & Weed Your Vinyl
Once your design is ready, place vinyl on your mat (color side up), select “Vinyl” as your material setting, and let the Cricut do its thing. After cutting, grab your weeding tools and gently remove the excess vinyl. Simple designs = easier weeding, which is great for beginners!
Step 3: Apply Vinyl to Signs
Use transfer tape to move your design from the vinyl sheet to your sign. Press firmly with a scraper or even an old gift card to avoid bubbles, then peel the tape back slowly. If you're using cardstock signs, make sure they're fully dry and flat before applying to prevent lifting.
Step 4: Arrange & Display in Your Classroom
Now for the fun part—decorate! Add signs to bulletin boards, classroom doors, student cubbies, or your reading corner. The pops of color instantly make the room feel refreshed and seasonal.
Tips & Variations
Try layered vinyl for a more colorful look
Use cardstock only designs if you want budget-friendly options
Mix fonts for personality, but keep them readable
Add students’ names to mini signs for a personalized touch
Spring signs are such a simple way to brighten the classroom without spending hours crafting—total win!